Wednesday, November 24, 2021

MVC RAZOR

 In this chapter, we will look at the Razor view engine in ASP.NET MVC applications and some of the reasons why Razor exists. Razor is a markup syntax that lets you embed server-based code into web pages using C# and VB.Net. It is not a programming language. It is a server side markup language.

Razor has no ties to ASP.NET MVC because Razor is a general-purpose templating engine. You can use it anywhere to generate output like HTML. It's just that ASP.NET MVC has implemented a view engine that allows us to use Razor inside of an MVC application to produce HTML.

View Engine

You will have a template file that's a mix of some literal text and some blocks of code. You combine that template with some data or a specific model where the template specifies where the data is supposed to appear, and then you execute the template to generate your output.

Razor Vs ASPX

  • Razor is very similar to how ASPX files work. ASPX files are templates, which contain literal text and some C# code that specifies where your data should appear. We execute those to generate the HTML for our application.

  • ASPX files have a dependency on the ASP.NET runtime to be available to parse and execute those ASPX files. Razor has no such dependencies.

  • Unlike ASPX files, Razor has some different design goals.

Goals

Microsoft wanted Razor to be easy to use and easy to learn, and work inside of tools like Visual Studio so that IntelliSense is available, the debugger is available, but they wanted Razor to have no ties to a specific technology, like ASP.NET or ASP.NET MVC.

If you're familiar with the life cycle of an ASPX file, then you're probably aware that there's a dependency on the ASP.NET runtime to be available to parse and execute those ASPX files. Microsoft wanted Razor to be smart, to make a developer's job easier.

Let’s take a look at a sample code from an ASPX file, which contains some literal text. This is our HTML markup. It also contains little bits of C# code.

<% foreach (var item in Model) { %>
   <tr>
      <td>
         <%: Html.ActionLink("Edit", "Edit", new { id = item.ID })%> |
         <%: Html.ActionLink("Details", "Details", new { id = item.ID }) %>|
         <%: Html.ActionLink("Delete", "Delete", new { id = item.ID })%>
      </td>
		
      <td>
         <%: item.Name %>
      </td>
		
      <td>
         <%: String.Format("{0,g}", item.JoiningDate) %>
      </td>
		
   </tr>
<%}%>

But these Web forms were basically repurposed by Microsoft to work with the earlier releases of MVC, meaning ASPX files were never a perfect match for MVC.

The syntax is a bit clunky when you need to transition from C# code back to HTML and from HTML code back into C# code. You are also prompted by IntelliSense to do things that just don't make sense in an MVC project, like add directives for output caching and user controls into an ASPX view.

Now look at this code which produces the same output, the difference being it is using the Razor syntax.

@foreach (var item in Model) {
   <tr>
      <td>
         @Html.ActionLink("Edit", "Edit", new { id = item.ID }) |
         @Html.ActionLink("Details", "Details", new { id = item.ID }) |
         @Html.ActionLink("Delete", "Delete", new { id = item.ID })
      </td>
		
      <td>
         @item.Name
      </td>
		
      <td>
         @String.Format("{0,g}", item.JoiningDate)
      </td>
   </tr>
}

With Razor syntax you can begin a bit of C# code by using the ‘@’ sign and the Razor parse will automatically switch into parsing this statement, this foreach statement, as a bit of C# code.

But when we're finished with the foreach statement and we have our opening curly brace, we can transition from C# code into HTML without putting an explicit token in there, like the percent in the angle bracket signs.

The Razor parser is smart enough to switch between C# code and HTML and again, from HTML back into C# code when we need to place our closing curly brace here. If you compare these two blocks of code, I think you'll agree that the Razor version is easier to read and easier to write.

Creating a View Using Razor

Let's create a new ASP.Net MVC project.

Razor MVC Project

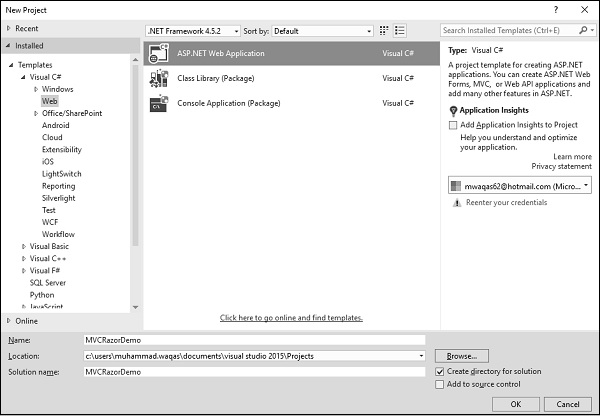
Enter the name of project in the name field and click Ok.

project_name

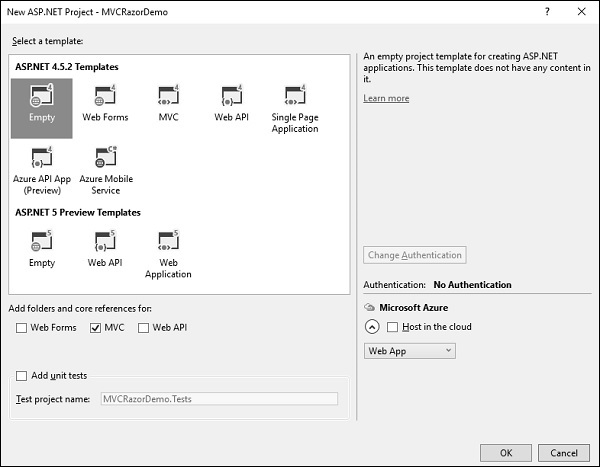
To keep things simple, select the Empty option and check the MVC checkbox in the ‘Add folders and core references for’ section and click Ok. It will create a basic MVC project with minimal predefined content.

Once the project is created by Visual Studio, you will see a number of files and folders displayed in the Solution Explorer window. As we have created ASP.Net MVC project from an empty project template, so at the moment the application does not contain anything to run. Since we start with an empty application and don't even have a single controller, let’s add a HomeController.

To add a controller right-click on the controller folder in the solution explorer and select Add → Controller. It will display the Add Scaffold dialog.

Razor Controller Folder

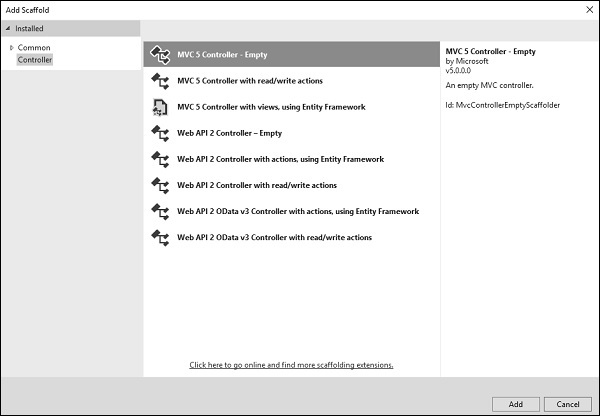
Select the MVC 5 Controller – Empty option and click Add button and then the Add Controller dialog will appear.

HomeController

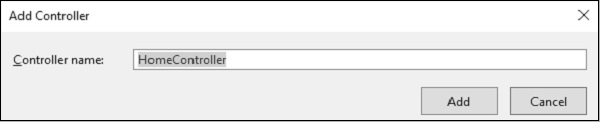
Set the name to HomeController and click ‘Add’ button. You will see a new C# file ‘HomeController.cs’ in the Controllers folder, which is open for editing in Visual Studio as well.

Editing in Visual Studio

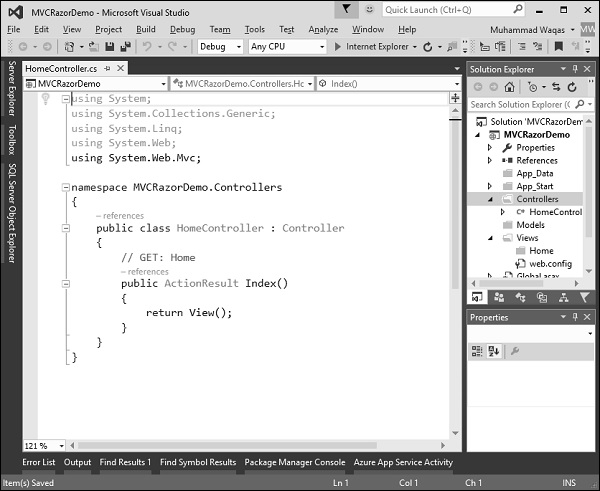
Right-click on the Index action and select Add View…

Index Action Add View

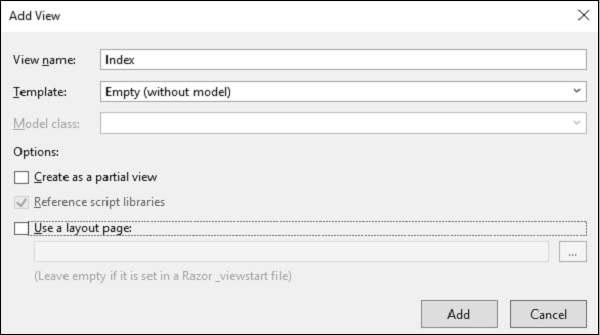
Select Empty from the Template dropdown and click Add button. Visual Studio will create an Index.cshtml file inside the View/Home folder.

Create Index.cshtml

Notice that Razor view has a cshtml extension. If you're building your MVC application using Visual Basic it will be a VBHTML extension. At the top of this file is a code block that is explicitly setting this Layout property to null.

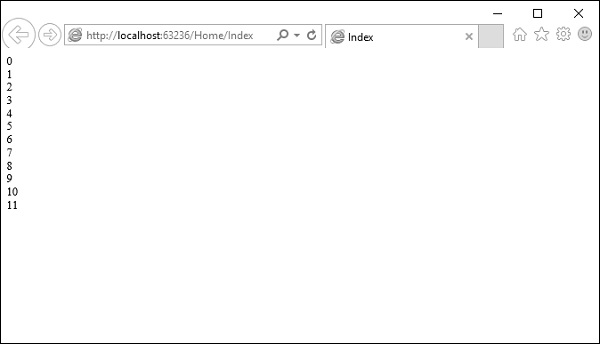
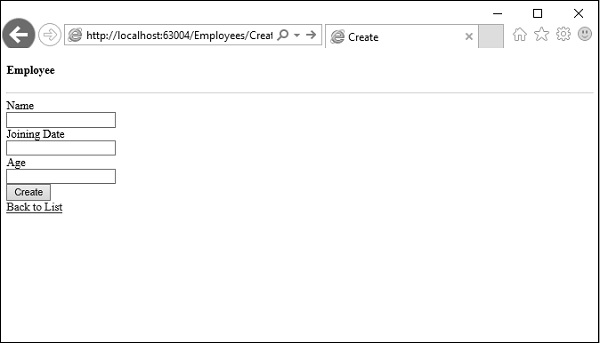
When you run this application you will see the blank webpage because we have created a View from an Empty template.

Blank Webpage

Let's add some C# code to make things more interesting. To write some C# code inside a Razor view, the first thing we will do is type the ‘@’ symbol that tells the parser that it is going to be doing something in code.

Let's create a FOR loop specify ‘@i’ inside the curly braces, which is essentially telling Razor to put the value of i.

@{
   Layout = null;
} 

<!DOCTYPE html>
<html>
   <head>
      <meta name = "viewport" content = "width = device-width" />
      <title>Index</title>
   </head>
	
   <body>
      <div>
         @for (int index = 0; index < 12; index++){
            <div>@index </div>
         }
      </div>
   </body>
	
</html>

Run this application and you will see the following output.

Razor Output

MVC VALIDATION

 Validation is an important aspect in ASP.NET MVC applications. It is used to check whether the user input is valid. ASP.NET MVC provides a set of validation that is easy-to-use and at the same time, it is also a powerful way to check for errors and, if necessary, display messages to the user.

DRY

DRY stands for Don't Repeat Yourself and is one of the core design principles of ASP.NET MVC. From the development point of view, it is encouraged to specify functionality or behavior only at one place and then it is used in the entire application from that one place.

This reduces the amount of code you need to write and makes the code you do write less error prone and easier to maintain.

Adding Validation to Model

Let’s take a look at a simple example of validation in our project from the last chapter. In this example, we will add data annotations to our model class, which provides some builtin set of validation attributes that can be applied to any model class or property directly in your application, such as Required, StringLength, RegularExpression, and Range validation attributes.

It also contains formatting attributes like DataType that help with formatting and don't provide any validation. The validation attributes specify behavior that you want to enforce on the model properties they are applied to.

The Required and MinimumLength attributes indicates that a property must have a value; but nothing prevents a user from entering white space to satisfy this validation. The RegularExpression attribute is used to limit what characters can be input.

Let’s update Employee class by adding different annotation attributes as shown in the following code.

using System;
using System.ComponentModel.DataAnnotations;
using System.Data.Entity;

namespace MVCSimpleApp.Models {
   public class Employee{
      public int ID { get; set; }
      [StringLength(60, MinimumLength = 3)]
		
      public string Name { get; set; }
      [Display(Name = "Joining Date")]
      [DataType(DataType.Date)]
      [DisplayFormat(DataFormatString = "{0:yyyy-MM-dd}",
		
      ApplyFormatInEditMode = true)]
      public DateTime JoiningDate { get; set; }
      [Range(22, 60)]
      public int Age { get; set; }
   }
}

Now we also need to set limits to the database. However, the database in SQL Server Object Explorer shows the name property is set to NVARCHAR (MAX) as seen in the following screenshot.

NVARCHAR (MAX)

To set this limitation on the database, we will use migrations to update the schema.

Open the Package Manager Console window from Tools → NuGet Package Manager → Package Manager Console.

Package Manager Console

Enter the following commands one by one in the Package Manager Console window.

Enable-Migrations
add-migration DataAnnotations
update-database

Following is the log after executing these commands in Package Manager Console window.

Package Manager Console Window

Visual Studio will also open the class which is derived from the DbMIgration class in which you can see the code that updates the schema constraints in Up method.

namespace MVCSimpleApp.Migrations {
   using System;
   using System.Data.Entity.Migrations;
	
   public partial class DataAnnotations : DbMigration{
      public override void Up(){
         AlterColumn("dbo.Employees", "Name", c => c.String(maxLength: 60));
      }
		
      public override void Down(){
         AlterColumn("dbo.Employees", "Name", c => c.String());
      }
   }
}

The Name field has a maximum length of 60, which is the new length limits in the database as shown in the following snapshot.

New Length Limits

Run this application and go to Create view by specifying the following URL http://localhost:63004/Employees/Create

Localhost Employees Create

Let’s enter some invalid data in these fields and click Create Button as shown in the following screenshot.

Enter Invalid Data

You will see that jQuery client side validation detects the error, and it also displays an error message.

Wednesday, January 9, 2019

Merge Gridview Cell

 <asp:GridView ID="GridView2" runat="server" AutoGenerateColumns="False"
                       
Width="696px" OnDataBound="OnDataBound">


  protected void OnDataBound(object sender, EventArgs e)
    {
        for (int i = GridView2.Rows.Count - 1; i > 0; i--)
        {
            GridViewRow row = GridView2.Rows[i];
            GridViewRow previousRow = GridView2.Rows[i - 1];
            if (row.Cells[0].Text == previousRow.Cells[0].Text)
            {
                if (previousRow.Cells[0].RowSpan == 0)
                {
                    if (row.Cells[0].RowSpan == 0)
                    {
                        previousRow.Cells[0].RowSpan += 2;
                    }
                    else
                    {
                        previousRow.Cells[0].RowSpan = row.Cells[0].RowSpan + 1;
                    }
                    row.Cells[0].Visible = false;
                }
            }

        }
    }

Monday, January 7, 2019

Gridview CSS

<STYLE>

.allcaps
         {
              text-transform:capitalize;
           
          }
       
         .allcaps1
         {
              text-transform : uppercase;
          }

</STYLE>

 <asp:BoundField DataField="company" HeaderText="Company Name"

   ItemStyle-CssClass="allcaps">


IF CONTROL
CSSCLASS="CSSNAME"


Friday, January 4, 2019

Gridview popup create using ajax

Create Assembly 

<%@ Register Assembly="AjaxControlToolkit" Namespace="AjaxControlToolkit" TagPrefix="cc1"

Create  CSS  Popup

 <style type="text/css">


        .modalPopup1
         {
            background-color : #87BEE1;
       
            padding: 10px 0px 10px 0px;
            padding-left: 10px;
            width: 50px;
            height :auto;
        }
   
        .modalBackground
        {
            background-color: Black;
            filter: alpha(opacity=40);
            opacity: 0.4;
        }
        .modalPopup
        {
            background-color: #FFFFFF;
            width: 400px;
            border: 3px solid  #666666;
        }
        .modalPopup .header
        {
            background-color:  #666666;
            height: 30px;
            color: White;
            line-height: 30px;
            text-align: center;
            font-weight: bold;
        }
        .modalPopup .body
        {
            min-height: 50px;
            line-height: 30px;
            text-align: center;
            padding:5px
        }
        .modalPopup .footer
        {
            padding: 3px;
        }
        .modalPopup .button
        {
            height: 23px;
            color: White;
            line-height: 23px;
            text-align: center;
            font-weight: bold;
            cursor: pointer;
            background-color: #9F9F9F;
            border: 1px solid  #666666;
        }
   
    </style>


Script to  close popup


    <script type="text/javascript">
        function pageLoad(sender, args) {
            if (!args.get_isPartialLoad()) {
                //  add our handler to the document's
                //  keydown event
                $addHandler(document, "keydown", onKeyDown);
            }
        }

        function onKeyDown(e) {
            if (e && e.keyCode == Sys.UI.Key.esc) {
                // if the key pressed is the escape key, dismiss the dialog
                $find('addAttribute1').hide();
                //$find('editAttribute1').hide();

            }


        }
    </script>

create  click  event 


 protected void lnk_report_click(object sender, EventArgs e)
    {
        //REVIEWER  report  panel 


        GridViewRow clickedRow = ((ImageButton)sender).NamingContainer as GridViewRow;
        Label lblID = (Label)clickedRow.FindControl("LBLID");
        Label lblemail = (Label)clickedRow.FindControl("Label10");
        Label lblname = (Label)clickedRow.FindControl("auname");

        Label8.Text = lblID.Text;
        Label11.Text = lblemail.Text;
        Label12.Text = lblname.Text;
        Button2.Visible = false;


        var closeLink = (Control)sender;
        GridViewRow row = (GridViewRow)closeLink.NamingContainer;
        Label9.Text = row.Cells[3].Text; // here we are


        foreach (GridViewRow r1 in GridView1.Rows)
        {


            if (r1.Cells[3].Text == "APPROVE")
            {
                Button2.Visible = true;

            }
           
         
        }


        ModalPopupExtender2.Show();
        panelassign.Visible = false;
        panelrev.Visible = true;


    }

Thursday, January 3, 2019

confirm on button click event

<asp:Button ID="btndelete" runat="server"     OnClientClick="javascript:return confirm('Are you sure you want to delete?');"   Text="Delete" Width="106px" onclick="btndelete_Click" Enabled="False"    Visible="False"  />

Summer Note EDITOR

 Step-1  <%@ Page Title="" Language="C#" MasterPageFile="~/admin/admin.master" AutoEventWireup="true...